Search This Blog

Showing posts with label CNC. Show all posts

Monday, July 3, 2017

Dowel Splice Joint

I've got a closet in my spare bedroom (storage room) that I wanted to add another clothes hanger rod to.  Among my scrap pieces I had two 1.25" diameter closet rod sections that together would be long enough, but neither was long enough on their own.  The distance to span was roughly 22". 

This is a CNC-cut splice joint I came up with to solve the problem.   My test cut done on smaller scraps is shown in the photos.  I'm calling it my radial finger joint.


The finished spliced rod is now loaded with clothes and is handling the weight with no complaint.

To hold the dowels on my CNC I used my adjustable angle clamping jig set to vertical with a vertical scrap of plywood clamped to it.  The dowels were trapped/clamped against the jig and edge.

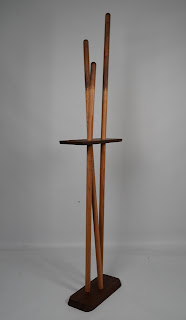
One application of this joint was for a student of mine's project.  Walnut dowel extensions to oak dowels.  A coat rack with key tray and umbrella hook, By Ellie Williams:
4D 

Friday, May 13, 2016

Light Bracket for my Overhead Camera Rig

This was a quick project to allow me to mount my LED lights directly onto the posts of my overhead camera rig.

The LED lights came with a short tripod base, but by unscrewing the lamp module from the base I realized they could be mounted on my camera rig. I just needed a bracket that would allow me to adjust the angle and direction they pointed at.  This is the solution I came up with:


Carved from a scrap of red oak using my CNC.


The center hole is 1/4" diameter for a 1/4" bolt.


The side hole was drilled with a #7 drill bit and tapped for 1/4-20 threads.


Each post was drilled and tapped for 1/4-20 bolts.


Friction between the bracket and post keeps the light from rotating when the bolt is tight.


Angle of the light can be adjusted by loosening the knurled handle.


 I will seal these brackets with tung oil to prolong their lifespan, and slow down any tendency to expand or contract. For the moment they seem strong enough, but the drier the oak becomes the greater chance it may split under the load of the lamp.

4D


Monday, April 18, 2016

Touch Off Light for my Probotix CNC

No touch off plate came with or is available for my CNC (yet).   I've been using a piece of paper to set my Z axis origin height. I put the paper under the bit, then slowly (.005") step it down until the paper is trapped. Set Z at 0 there then lift up to remove the paper. Paper is generally from .0025 to .005" thick so I know I'm within .005 using this process.

A Probotix.com User Forum member KLWestfall posted his idea of using a light bulb, thin metal plate, and an alligator clip to signal when Z has touched down.   That idea intrigued me so much I knew I had to make my own version.

I went to my local Radio Shack (which sadly has now closed down thanks to internet competition) and picked up a battery case, 3v green LED bulbs, and some AAA batteries to go with the unused touch puck and alligator clip (Link) I've had for awhile.

I drilled a 5mm hole in the battery case for the LED, then wired the LED in line with the batteries and contacts. Now the LED glows when the plate and alligators touch.

To use I clip to the router bit and place the plate underneath it atop the material I'll be cutting. I jog the bit to within 1/8" or so of the disk, then set my step increment to .005".   I'll then step down until the LED glows. I'll move up one .005" step, then reset my increment to .001".  Now I step until the LED glows again, and I know I'm within.001" of the top of my material.  I've carefully measured my plate.  I enter that value when touching off Z in LinuxCNC.

This solution isn't as automated as it could be if the touch plate was wired into my CNC controller, but so far I haven't found any info on how to go about that.  The LED that glows on contact will be more accurate than using paper was. The led is easy to see from back at the keyboard/PC station and makes it easy for one person working alone to handle setting Z.

The only problem to this point was that my touch puck wasn't consistently thick.  I had my CNC mill a hole to tightly fit the metal disk. then press fit my puck upside down in that level (to the CNC) hole. I had the CNC mill a flat plane across the plastic bottom of the puck to make it uniformly thick.  The photos here show a simple bar of aluminum used for the touch plate,  The numbers on the battery box remind me how thick the plate is.

If you don't have or want to buy the puck I linked to, then any small chunk of conductive metal and an alligator clip lead can be used. You'll need a way to hook one wire from the battery case/LED  to the plate, then solder the other wire to the alligator clip.  I drilled a 5/32" hole in my plate and used a speaker plug inserted into it to connect from the battery. I was inspired by how the touch plate for my CNC Shark connects.

4D
