Search This Blog

Tuesday, April 12, 2022

Woodworking Education: Making Samples vs. Making Projects?

What is the best way to teach Joinery, Tool Use, and other Fabrication Processes to students studying furniture design that have to make prototypes of their designs?

When I started to teach furniture design to students with no prior woodworking or fabrication experience I took them around to all the main power tools and had them process a scrap board through whatever machine we were at.  When it came time to start designing projects I had students make samples of a few common woodworking joints. What I thought the students should learn from the samples and scraps didn't seem to stick. When they finally made projects that needed joinery they needed more specific information about how to choose and size and orient the joints for their specific design.  It turns out that samples of joints made are no more effective than photos of joinery in a book or on the web or in drawings of just joints.  The samples (or photos) do serve as a reference to show students what type of joint they could use for such a connection, but learning how to make the joinery sample out of context to choosing and sizing that joint type for a project is abstract, incomplete information, and easily forgotten.  Same for making scraps with all the machines. While that teaches the student hopefully how to turn the machine on and use it, it doesn't explain and demonstrate the logical order of steps for processing from a rough board to finished project parts for an actual project.  

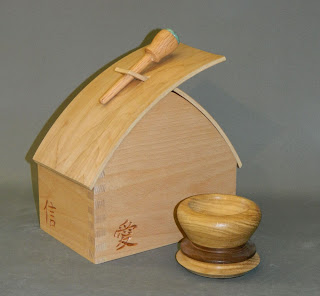
The students in a class need to learn the reasoning for choosing and sizing the joinery used for a project.  Small projects that require many process steps, joinery, and tools to learn about are educationally effective and efficient.  The Joinery Box project is a great example. Plus the students now have a goal to end up with a nice project rather than a set of joint samples and scraps they'll likely abandon or throw away.  They also learn the machines used and that logical order talked about above.  All at the same time. 

Basic Box. Much Learned

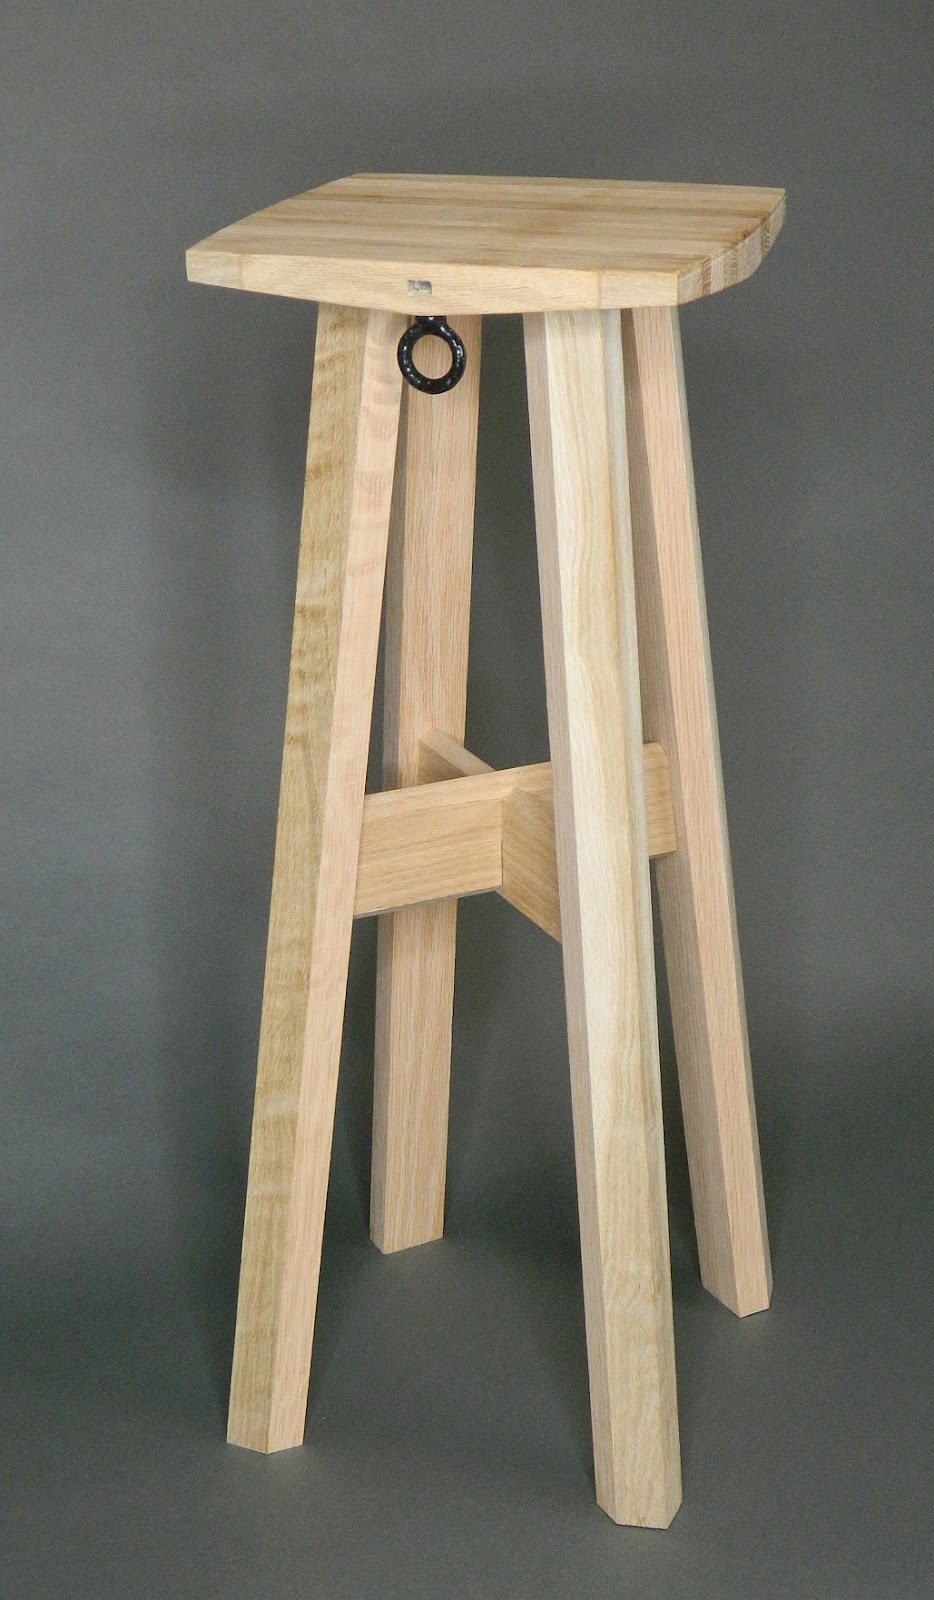
For typical table joinery a small table that all the students make is a thorough teaching opportunity. The Tiny Table project (links below) teaches mortise and tenon joinery in context, half lap joinery in context, processing and gluing up wood for the table top in context, using the CNC to make the top more interesting than a simple square or rectangle, and a few different methods for attaching a table base to a table top.  Showing them the hardware for attaching a top to a table base is a good place to explain wood expansion and contraction.  


The Tiny Table project is also about learning detail continuity throughout a design. When all students are done with the project it should be obvious which base belongs with each table top.   To get them started it pays to shown them good examples from past semesters as a reference to what level of creativity and detail continuity they should meet or exceed. Keeping the project small keeps the costs low, the materials and time used down, yet gets you farther educationally than spending time and money making abstract samples or scraps that end up in the trash bin. 

While possible, it has never been efficient or logical to have beginning students make their own furniture designs before they have learned a broad array of processes and joinery in the context of a project.  When you have students jump right into designing their own furniture projects it takes considerably more time and input from the teacher to help them choose and make appropriate functional joinery in the fabrication of their designs.  Their understanding of what is possible is limited. Use small projects to teach them a broad array of processes and joinery in context and generally the students can easily scale up for furniture projects with little need for more input from the teacher. This project based teaching strategy has been known about for a few centuries, and my personal teaching experience over the last 45 years has proven over and over again that it works.  This method and these projects evolved from annual iterative collaboration between 3 furniture design professors with a combined 100+ years of teaching experience. The projects help transition students from knowing nothing or little about fabrication to designing and building original and award winning furniture designs.  The broad knowledge students end up with helps them design with a deep assurance that what they've designed can be built. They know how it can be built and can describe the tools and processes that it will require. Creative students better armed create far more original, interesting, and functional projects with less need for help from their teacher or fabrication lab assistants.   

Related educational design and fabrication projects:

Joinery Box.  Not about a box.

The Lathe

The Value of Sample Blocks.

Tool names and their functions.

Calculating the actual costs of their projects.

Tiny Table 1

Tiny Table 2

Tiny Table 3

Tiny Table 4

Woodworking Education: Tool Names and their functions/uses.

Beginning fabrication class students generally have no idea what all the available tools and clamps are called or used for.  Teaching them what each tool is called and how that tool can be used is important.  Throw in showing the students where the tools are kept in the shop.  There are often many variations of tools that vary for specific reasons, and an uninformed student may choose the wrong version if they haven't been taught what the variations are and for. Coming back with a Quick Grip when a C-Clamp is needed is one example. 

Clamps come in many forms, and while all of them may work fine for simple clamping challenges, some work better than others for difficult clamping challenges.  Show the students all the different clamps, and the names for them as well as the specific benefits and situations where they might be best used: T bar clamp, C clamp, F clamp, quick grip, spring clamp, hand screw clamp, parallel bar clamp, gear klamp, belt clamp.

Hand held power tools are also worth mentioning and demonstrating. Router, plunge router, trim router, the variety of router bits available, jig saw, drills and drivers, circular saw, sanders, multitool, domino, biscuit jointer,  Lamello jointer, etc..

Squares come in many forms. All will work fine for drawing simple 90 degree lines or checking corners for 90 degrees.  Some squares have multiple functions and it helps to demonstrate the assorted functions to the students.  Try square, Sliding T Bevel, Combination square, Speed square, Framing square, T-Square. Check for square before relying on the last two. 

Drill bits come in many forms. Knowing the name of each type, and use scenario for each type is critical toward using the appropriate bit for the material being drilled into.  Spade bit, spur bit, Forstner bit, twist bit.  It is also useful to know about plug cutters and stepped drills.  There are specialty bits for drilling into masonry/bricks/cement, plastics, and glass. 

Show them the portable drill guide.  Useful for drilling  accurate 90 degree or specific angled holes in the middle of panels where the drill press can't reach.

The Dowelling Jig.  No, it is not a dance.  Ours are self centering tools to make drilling a hole perfectly centered and aligned to your mark in the edge (or narrow face) of a board.  Don't forget the drill centers.  They are useful for lining up holes between parts when using dowels to connect them.  

Screw Drivers: Slotted, phillips, allen, star (torx), triangle.  Knowing the names and look of each unique driver type, along with where they can be found is critical.  This is a great opportunity to talk about different types of screws. 

Lathe tools:  Round nose, Skew, Parting tool, Gouge, specialty.   Live and dead centers.  Lathe wrench. Faceplates and how to choose the right size for a project, What they look like. Where they are kept.  How and when they are used. In what conditions should gouges NOT be used?  Why?   Face Shields and other safety tips like no loose clothing, keeping long hair tied back, remove loose jewelry, etc. should be mentioned and stressed, 

Wrenches:  Socket sets, open end, closed end, ratcheting wrenches, crescent (adjustable) wrenches, extensions, metric vs imperial, plyers, vise grips, tin snips, left and right aviation snips.

Tap and Die sets. Versions for cutting threads in wood.

Wood chisels.  Socket chisels.  Cold chisels. 

Drafting (layout) tools:  Compasses, 45 degree and 60-30 triangles, adjustable triangle, speed square, circle templates, ellipse templates, french curves,  protractors,  

Subsets of all the tools can be introduced to students daily.  On the following class day test them over the previous set, and introduce a new subset. Repeat until all the tools have been shown and explained. From then on it helps save time when students know what you or they want and where it is. No more surprises when a student comes back with something other than what you asked them for. 

Some related educational articles:

The Lathe.

The Joinery Box.  Not about a box.

Making Projects vs Making Samples.

Material Sample Blocks.

Calculating the Actual Cost of Projects.

Tiny Table 1

Tiny Table 2

Tiny Table 3 

Tiny Table 4


Woodworking Education: The Value of Material Sample Blocks

The majority of residential furniture is made from wood. Most places there are usually many local or regional hardwoods to choose from with aesthetic and structural property variety.  While you can find wood properties on the web or in books, being able to handle and machine and sand and finish and weigh several is by far the best way to learn about them.  Knowing the unique properties of several is critical when choosing which one(s) to use for your furniture or other wood projects.  

Making a set of sample blocks is a good way to learn those unique properties. You end up with a useful reference set to look back on and also show potential future clients. 

The samples here are 5 inches wide, 8 inches long, and minimally 3/4" nominal thick.  Approximately .28 bd. ft. each. Thicker boards present more surface area on the sides and end, so choose 6/4 or 8/4 wood if you can. Nothing critical about these dimensions except it is easy to find hardwood boards that are 5" wide or greater.   Make them from whatever hardwood species are available locally/regionally.  The top face has a 1/8" wide and 1/8" deep groove down the middle in both directions to create a separation between the 4 corner sections. Continue the groove down the sides and ends.  The groove also comes in handy when finishing each corner as you can stick a cardboard shield in them to protect the neighboring corners from brush or overspray.  A small bevel or small roundover cut on the sides will ease the square edges and make a smooth transition from top to side and end surfaces.   

Unfinished 4/4 Block

8/4 Nominal Block

Now you have four corners that each can have a unique finish applied. It is invaluable to see the difference in how end grain and side grain can look with each finish.  The quarter sawn grain view of red or white oak or white ash is considerably different than the face grain. Flecks and medullary rays add visual interest, and the parallel growth ring lines can reinforce and contribute to the visual aesthetics of a rectilinear design. Many hardwoods have similar aesthetic difference between their face grain and quarter sawn grain.  In fact for the woods listed above a sample block composed of 1/2 face grain and 1/2 quarter sawn wood glued side by side helps see and appreciate the difference between the two views of the wood grain. 

The back face of the blocks is a great place for labels to record the stains and finishes used on each respective corner.   Typically 3 corners have a stain or dye or bleaching treatment on them with a clear topcoat. The 4th corner is left natural with only a clear finish applied. Sand all blocks progressively up to 360 or 400 grit, making sure to remove all tool marks.  Follow with 0000 Steel wool. A good visual test is to see if you can see reflections of overhead lights with no obvious scratches in the sanded surface.

Once ready for finish it is worth having a postal or kitchen scale in the shop so each block can be weighed.  Record the weight on the back of each block. Why?  Weight is a property of wood.  Wood weight varies considerably between species and can vary a little between  different trees of the same species.  How dry the wood is also affects its weight. Despite that knowing the relative weight of each available wood species comes in handy when choosing the wood to use for a project. Making a portable table or desk? Choose one of the lighter weight woods.  The identically sized blocks make for easy weight comparison. Knowing the weight and volume of a sample block you can extrapolate to calculate the expected final weight of a project design. I've known many students who simplified/scaled down their designs or at least changed which wood they planned to use once they calculated approximately how much their proposed design would weigh.   

Making the blocks also presents an opportunity to learn the table saw, and a crosscut saw, as well as one or two ways to make the grooves (router table and a 1/8" end mill, or table saw set 1/8" high), and chamfering or rounding over edges.  Throw in learning  about sanding and sandpaper grits.   As all blocks are the same length this is a good time to demonstrate using a stop block clamped to the compound miter saw or radial arm saw fence. When every student has a set of blocks that are the same dimensions it speeds up getting the centered slots cut. Once a tool is set up for a cut all students can use it.  The sanding and finish application of these blocks can happen over time.  It is a good project for students to work on when they are waiting on supplies or machine availability for their other projects. 

In addition to hardwoods, a block made from 18mm Baltic Birch plywood with veneer applied makes a nice addition to the reference set.  Students get to know about veneers and how to apply and trim them flush. Some edge trim can also be added on the long sides so students can learn how to apply it, and see the difference between a veneered edge verses a smooth sanded plywood edge. Perhaps apply a 1/8" thick piece of matching hardwood trim to one long side, with edge veneer to the other.  

Other materials might be used to make furniture or furniture parts. Steel, Aluminum, and Acrylic samples are opportunities to learn how to clean and sand and finish the metals, and polish the cut edges of the acrylic piece to where you can see as easily through the edges as you can through the face.  Add a lesson on acrylics with a demonstration on how to bend it, polish the edges,  and solvent weld pieces together.  Some students may choose to peen a texture into the steel.  Prime and paint or powder coat the steel after cleaning it. The Aluminum can be sanded then polished to a mirror finish, then coated with wax to keep it that way.  These samples can be 2" x 5" x 1/4" thick.  Cut from 2" wide flat stock.  Think of one more and a set of 4 will fit in the same area as the 5" x 8" wood blocks. 

These samples are themselves an end project. A step they'll need and appreciate they have when it comes time to choose and finish materials for their more complex projects. More blocks could be test samples for other techniques the students might want to use on future projects.  V-Carve inlaying of contrasting wood into a board is one. Resin fill of carved patterns is another. Laser etching on wood,  carved texture variations, and 3D surface creation are just a few of the possible opportunities for useful samples to add to the set.     

Other educational projects:

Joinery Box.  Not About a Box.

Making Projects vs Making Samples.

The Lathe.

Tool Names and Their Functions.

Tiny Table 1.

Tiny Table 2.

Tiny Table 3.

Tiny Table 4.

Calculating actual project costs.


Woodworking Education: The Lathe.

The lathe is an invaluable tool as it holds the potential to make many furniture and related project parts.  

1. This lathe lesson was designed to teach proper use of many lathe tools and the outside caliper.  

2. It teaches how to lay out, measure, and produce an exact duplicate of a design they have drawn up.  

3. It teaches the value of accurate dimensioning of turned parts so when done the parts will fit perfectly together. 

Knowing these things is extremely important. Students may eventually want to make 4 identical table legs, or several matching spindle sections for a shelf unit.  Both spindle (between centers)  and face plate mounted projects are covered.  Examples of past projects done on the lathe are shown during class to inspire and present the level of design and production students are expected to meet or exceed. 

The project requirements are to design and then make a small lamp base or candle stand to assemble from a faceplate turned part and a spindle (between centers) turned part. 

Face Plate Turning
Templates made from chipboard (thin cardboard) that are the negative profile of the project design are a good way to transfer the design transitions to the lathe project. They are also useful to verify that what you have turned matches what you have designed. Diameters at each transition of the turning can be written on the template for reference. The cardboard from cereal and other food boxes is a good cheap source for template material. 3mm birch plywood might be used for a more durable template. If you have access to a laser cutter it can be used to cut out a very precise template. Printing out the shape on paper, or drawing it out on paper, gluing it to the chipboard, then cutting it out with scissors or a utility/x-acto knife is the low tech way to make one. Using plywood the scroll saw is the recommended tool to cut it out with. 

Simple Spindle Project Template

A few tricks are also demonstrated or shown, such as gluing boards together with paper (newsprint works great!) between them to make them easy to split after turning.  Glue the faceplate project board to a piece of plywood with newsprint between, then screw through the metal faceplate into the plywood and not the project block. Once turned and finished it is relatively easy to split the plywood off the turned piece. All that is left is to sand off the bottom paper/glue remnants and apply some finish.  Two wall mount half conical sconces shades split from one turning is one example. Half round or quarter round moldings for the edges of a table or desk project is another example. In the example below, start with paper glued between all 4 outer sections and the square core. Cap the end by screwing on a plywood disk with screws into the red area(s).  Turn a cylinder. Remove (split off) the outer sections from the core. The inner red area can be removed by guiding the curves at an angle
across a table saw spinning blade. Cove Cutting on the Table Saw
 
Round Corner Sections From The Lathe
Smaller curved sections can be a simpler 4 corner glue up. The inner red area can be removed with a ball end bit half exposed on the router table. The method used depends on the size of the inner cove and the sizes of available cove/ball end bits for the router table. 
Simpler 4-corner glue-up. 
Spindle turnings of wood projects that will eventually be split should be mounted on a faceplate on the live center end, and have a plywood plate screwed into each of the parts on  both ends so they won't split apart while being turned. The turned post of a lamp base might be split so a cove can be cut down the center for the power cord before gluing them back together.  You could also cut the cove on two halves before gluing them up to turn.  Just plug the ends with a short dowel which can be easily drilled out after turning.  You can make 4 corner table legs from one large turning using this trick.  These suggestions are just a fraction of what is possible (and have been done in the past) using a lathe.  

Spindle Turning. Grooves for live enter teeth.

The orientation of wood grain when mounted on the lathe is also important to consider. Tall or long objects should have the wood grain running up and down the height/length.  Short projects might look better with grain flat against the faceplate. You could glue up small segments to make a solid block before turning.  Make segments of different color woods and then make patterns by stacking them in creative ways.  A large bowl shape might be easiest to turn if glued up from 4 (or more) blocks that pinwheel together.  To avoid tear out on flat grain projects it is best to bandsaw cut the project block into a rough cylinder before mounting it on the lathe.  Insert a strip of dark wood into one corner of a light wood block that will be an interesting profile turned table leg.  The dark corner will emphasize that interesting profile, and can be the inside or outside corner of the leg when mounted.  

Blocks glued up from different species of wood can make for beautiful turned projects or parts, while giving them the skills needed and ideas when they use the lathe for furniture parts. 

Why bother with faceplate mounted turnings?   One example would be turning a flange for a center post to slip into under a table top.  A larger flange could be the base of the same table.  A whole round small pedestal/tea table top with an interesting edge profile perhaps?  A large shallow dish that eventually a seat bucket for a chair may be cut from, or an entire seat pan for a stool? Turning the headstock end of the lathe around and using a free-standing tool rest allows turning large diameter table tops or wagon (spoked) wheel rims. These are furniture related faceplate mounted projects that students have created in the past.

A table center leg top flange
A simple finish for lathe projects is French (Friction) Polish. A mixture of equal parts Shellac, de-natured alcohol, and boiled linseed oil can be applied to projects still on the lathe and spinning.  Apply with a rag and the friction heat created is what dries the finish. Three or more coats can be applied in short time and are recommended. Keep the lid on the bottle between applying to prevent the alcohol in it from evaporating. Don't set the bottle on the lathe table where vibration may knock it to the floor.  Set it on the floor where it won't be kicked if no other place is available. 

Lastly, don't forget the metal lathes. Metal parts for furniture have been made on the metal lathes in the past. Tapered aluminum or steel legs. Chamfers and threads cut in the ends of solid rod stretchers for tables or seating. Etc.. A top finial in brass or aluminum for the halo of a wood turned lamp might be a good project to design and make using a metal lathe. Finial Ideas  Finials for the top of shelf posts or turned metal feet for the bottom are parts that have been made on the metal lathe by students in the past. As access to the metals lathes is limited, fabrication of the top finial can start with a 3D printed version.  Let students use the metal lathe one after the other throughout the semester and eventually all plastic finials will be replaced by brass or aluminum versions. 

A recommended assignment for this project is to have students submit a 3D rendering of their design with a dimensioned section view on the same page. Do this before they start turning wood.  Skipping this step I've had students turn a random thing then measure it to make a drawing. Iterative contemplation of a design explored using the capabilities of 3D CAD software to visualize always produces better turned results than finding a shape as you turn it.   Even Sketchup can be used to quickly spin a profile line around a center line into a lathe turnable 3D image to examine. The goal is to make a project that matches the design drawing in shape and dimensions.  

Some related educational projects:


Woodworking Education: The Joinery Box. Not About a Box.

Having taught furniture design to college students for the last 45 years or so, it became clear over time that fewer and fewer college students arrived with any fabrication experience. 

This joinery box project is not about being a box, but rather a great project to show beginning students many fabrication processes and tools.  Demonstrating tools in the process of making parts for a standardized project kills two birds with one project.  Students end up with a project they can use and are motivated to complete. Rather than making scraps to see a tool in action, students learn the logical sequence of tools/processes required to get from raw materials to their finished project parts. 

This project has evolved each year to become an efficient way to teach the students many basic fundamentals. When done with their box, and a few other similar basic projects, the students are then equipped to design and build sophisticated furniture projects with little need for build input from their instructors.  Students learn several processes on the way to making something they are personally interested in having.  The joints learned here will come in handy when students tackle designing case goods. Making joinery samples alone is no better than having the student draw up or just find photos of joints.  Making the joints for a useful project also teaches them an application and how to size or alter/adjust the joints for that application. 

You can use this project to introduce many tools to the students. Those include the Jointer, Planer, Table Saw, Crosscut tool options, Bandsaw, Drill Press, Assorted drill bit types and their uses, plug cutter bits, Routers both hand held and table mounted, vacuum pump and bags, several sanding tools, Biscuit Jointer, and the CNC. 

The box is made from any 4/4" thick hardwood blank at least 32 inches long and any width 4" or more.  It has a unique corner joint on each corner.  Miters reinforced with a spline, a rabbet joint reinforced with countersunk screws covered by plugs, a finger joint, and a simple rabbet/dado joint.   The sides are 6" x 9" outside, with 5/8" thick walls and a 1/4"(6mm) or 1/8" (3mm) thick plywood bottom. A laminated curved panel is added, and integrated into the design by the student. Some simple CNC engraving is also required, so the students learn how to generate a CNC ready vector file.

The basic box corners.
1. If the board is warped or cupped then one face of the board may need to be joined flat. Once flat the wood blank must be joined on one edge with the flat face against the fence. While at the jointer it is a good time to show the students a few other things that can be done there:  Jointer Tips

2. The blank is next planed to 5/8" thick precisely. Having a digital caliper handy will help the students zero in on 0.625" thickness.  Planer Tips

3. The blank is then ripped to a consistent parallel width using the table saw. This is a good time to mention/demonstrate the tenon jig, miter gauge/sled, dado blade sets, cove cutting, table saw safety, etc.. 

4. One end is checked for square. This is a good place to show students the many different squares and the unique features of each. If the end is not square then it is trimmed square to the sides. (compound miter saw, radial arm saw, or table saw with miter fence) 

5.  Students calculate out (and hopefully record to remember) how long each box side needs to be to account for the joinery that will be used. (A great excuse for having an example box for them to examine) 

Board Layout

Renderings shown are created by my CNC software and don't necessarily show the wood grain running the best direction.   Normally the grain would wrap around the box sides rather than from bottom to top of the box sides

6. Starting from the squared end, box sides are measured and marked, cut, then measured and marked again before cutting the next piece.  Adjacency of pieces should be kept track of as grain patterns look nicer when they flow around a mitered corner.

Student example. Curved lid.

7. The table saw (with miter fence) is the best tool to cut miters on the mating ends of two adjacent box sides,   If not more than 5" high or so the miters can be cut standing up or laying down on a compound miter saw. 

Splined Miter
8. The table saw is also used to cut a slot for a spline of 1/8"(3mm) plywood  that will reinforce the mitered corner. Tip the saw blade 45 degrees. Lower the blade so it doesn't cut through the wood.  Locate this spline slot close to the inside corner of the miter.  An alternate option might be using the biscuit jointer and two #10 biscuits as splines for reinforcing the mitered corner.   One benefit of splines is that aligning and clamping the mitered corner is easier.

Tips and tricks for making a splined miter corner joint! 
CNC cut plank texture shown.

9. A table saw with a dado blade set installed, or a router table with a 5/8" or wider flat bit installed can be used to cut a 1/8" deep rabbet, 5/8" wide, on one end of one box side.  A backer board is recommended to prevent tear-out when cutting across end grain on the router table. 

Shallow rabbet

10. The drill press is used to drill a 1/8" deep 3/8" diameter counterbore for flat head screws that will reinforce the shallow rabbet joint.  Holes are centered 5/16" from the end. Two or three screws can be used depending on the width of the board.  This is an excellent opportunity to demonstrate the drill press. Show students how to select and install the appropriate drill bits for the screws being used, select proper bit speed, adjust the table height and angle, set depth of cut, etc.).  This step is not about the joint.  Selecting drill bits and learning the drill press in context is the point. 

Screw Holes for the Rabbeted End

11. Drill a shaft hole for those screws.  You don't want the screws used to cut threads in the outer piece.  

12. Drill a pilot hole for the screw threads in the end of the mating box side.   Mark through the holes drilled in #11 above. Verify that the marks are 5/16" from the edge. Centerpunch, then use a hand drill or the drill press with the appropriate bit. A vice can be used to hold this board upright on the drill press table.

13. The drill press can also be used with a plug cutter to make matching or contrasting dowel plugs to cover the screw heads after the box is assembled.  

Interlocking curved tops. CNC engraving shown.

14. Finger joints (aka box joints) can be made using a fixture set up on a router table with a 3/8" or 1/4" spiral end mill.  Optionally a box joint jig could be made for the table saw and dado set, or the CNC could be used to cut them with the parts clamped vertically.  Using the CNC the width and spacing and even shape of the fingers can be changed. Pseudo Dovetails. Finger Joint Fixture

3/8" Wide Fingers, Centered

Mating Fingers
Feel free to swap out hand cut or jig cut or CNC cut dovetails for the finger joint corner.

15. A minimum of 3 pieces of 1/8" thick bending plywood are then glued together over any existing form to create a curved plane after being removed from the vacuum bag. Students then decide how to use this curved plane in or on their box. Several tools may be used to reduce the raw curve to the needed part of their box.  Optionally some hardwood could be re-sawn into thin strips (band saw, horizontal drum sander), then bent and clamped over a curved form with glue between strips to make a handle or box divider or even one curved side of the box. Specific details of the box may change depending on how they want to use the curved plane. 

Laminated Curve
16.  Students must then provide a vector outline of whatever they want to have V-carved or V-inlayed onto their box.  This is a great opportunity to show them how the vectors are turned into toolpaths, as well as all the bit options available for such cuts.  This is a good place to show students previous examples of what students have done for this assignment. 
Hole pattern was CNC cut before laminating the insert lid curve. 

Now that students have designed something to be CNC cut they are required to learn about  toolpath creation, using the control software for the CNC, choosing and installing the needed router bit for their job, clamping down their box side securely making sure the clamps used won't interfere with what the CNC will be cutting, and then loading/zeroing out/then running the CNC file to cut what they designed. 

17.  For the 1/4" (6mm) plywood bottom a 1/4" wide slot is cut 1/4" up from the bottom inside edge of each box side. Some sides will need a stopped slot, and some can have the slot cut all along the edge. No slot artifact should appear on the outside of the box after assembly. Best cut with a 1/4" end mill in a table mounted router. Careful attention should be made to make sure all slots are on the inside bottom edge of each box side.  Students could alternatively use 1/8" (3mm) plywood and a 1/8" end mill given the small size of this box. 

18. A tongue and groove joint is the last corner on the box.  Both sides can be cut on the router table with just slight changes to the setup.  Cutting across the end grain a backer board is advised, as otherwise the grain may tear out or split off. This joint is a good simple choice for the corners of drawers.  

Rabbet/Dado
Demonstration of how to make this joint using the router table.

19.  All joinery is created and tested for a good fit. The insides face of all box sides are sanded smooth progressively from 80 grit up to 320 grit. Follow with 0000 steel wool.  A good test for a smooth surface is to be able to see reflections of overhead lights in that surface.  With the joinery areas taped off a finish is applied to the inside faces. This is done before assembly as the inside faces are much easier to sand and finish this way. 

20. The box sides are glued up. Any glue spill-out is relatively easy to clean/wipe/peel off a finished interior surface. 

21. A handheld trim router with a chamfer or small round-over bit can be used to soften the sharp outside corners of the box. Alternatively the sharp edges can be softened with a few strokes of 180 or 220 grit sandpaper on a sanding block held at 45 degrees to the edge.  

22. Outside faces of the box are sanded and finished after the box is glued up. This delay is to account for outside damage that may result from clamping together the box. 

This joinery box project is not about being a box, but rather a great project to show students many processes.  Both how they are done and why they are used. To reinforce the students knowledge about the processes and joints used it helps to test them about the tools used, sequence of steps, and names and look of the 4 corner joints.

While this isn't a furniture project, the joinery box is a low risk high yield beginning project. It gives students a deep understanding of many fabrication processes and sequence logic for complicated projects. Success with this project gives them confidence about their abilities to do well.  It reduces their trepidation toward starting more complicated and more risky/expensive furniture projects.   It reduces the need for instructor help in the future classes. 

Other educational woodworking projects: 

The Lathe

Material Sample Blocks

Tool Names and Functions

Making Samples vs Making Projects

Tiny Table 1

Tiny Table 2

Tiny Table 3

Tiny Table 4

Calculating Actual Project Costs.


Woodworking Education: Tiny Table 1

Tiny Table 1

A Lesson in Wood Fabrication and Joinery

Teaching furniture design to college students who have no prior experience with fabrication techniques requires showing them examples of how to turn raw materials into finished furniture. 

Tiny Table is a final project for the beginning workshop class to teach them common wood table joinery. It also shows them all the steps needed to get from raw wood to finished parts that make up the table.  It is best to have students all work though the required steps to build their own version. It gives them motivation to do a nice job, and they end up with something they can use. In the process of making their own they also learn about the tools they will be using.  That and the typical joinery used as well as how to make the required joints.

The project is also a lesson about and demonstration showing the continuity of details possible.

All tiny tables are 24" tall and have a top that is 9" x 9". Mainly to keep costs low, and provide an interesting category of furniture to design for,  All students will confine their designs to these dimensions.  There are 3 other tiny table examples with links to them below. 

A tiny table is intended to stand next to a desk by your chair and provide a dedicated spot to charge your phone or smart watch or rest your mug of coffee or other drink of choice. Intended to serve as a place to charge your phone, this table top could potentially have a wireless charge coil embedded or at least some clever allowance for managing charge cords.  This table could also find many other places in your home to live.  

The 4 legs are connected by crisscrossing stretchers and attaching to the 9"x 9" top.  The underside of the top is 3D carved to meet the slanting legs at 90 degrees as they approach at an angle other than 90 degrees.  While on the CNC the perimeter shape can also be cut. If a wireless charging puck is to be used, then a precise pocket for it and a slot for its power cord can also be cut on the CNC.  For this Tiny Table project all students will design, create toolpaths for, and cut out their own table top using the small CNCs.  

Underside CNC carved

For this example, the top is a square with bowed out sides. This leaves the corner angles a bit larger than 90 degrees.  

Top profile
The outer bevel on the legs were cut to the same angle.  Legs connect to the table top one of two ways depending on how the wood of the top was glued up. Figure 8 connectors can be used if the top surface is face grain and prone to expand/contract over time. If the top is quarter sawn or rift cut then tenons on the top of the legs can join into mortises cut in the angled surfaces of the top underside.  Figure 8 Fasteners

Table leg. Outer bevel matches table corners.
The top and bottom edges of the stretchers also have beveled edges that match the top corner angle.  The stretchers are offset from each other so the bevels aren't interrupted when they pass.  The first stretcher bevels pass over the opposing stretcher.  On the opposing stretcher they appear to run into/through the first.  Offsetting intersecting stretchers adds some interesting aesthetic variation and encourages doing something interesting with the top and bottom edges of the stretcher. Two diagonally opposite legs have the mortise for the tenon a little higher than the other two legs. The two stretchers are not identical. 
Top and bottom bevels matches leg bevel

Renderings in this article are from my CNC software and don't necessarily show the proper orientation of the grain in the parts.  Grain direction in the stretchers should run from tenon end to tenon end. 

This tiny table teaches students how to properly size and make mortises and tenons, as well as layout and cut a halving joint for the crossing stretchers in context. The top and potentially the legs are opportunities to show students how to glue up panels of thick wood blanks from narrow/thinner strips of wood. Reorienting the wood face grain can reduce expansion/contraction by 2/3.  

Not all projects have to look the same, but the base of each should relate aesthetically to their top.  All surfaces of every component are opportunities to add detail to. It is the continuity of details in this project that adds to the story that can be told about the design.  The story that you can tell is what makes the design more memorable and desirable. 

Don't forget about finish.  Some woods accept stain well to alter their color.  Some may look better painted. How about India ink to blacken oak or ash but leave the grain details visible?  Top finish can be oil based or lacquer based or water based or wax or French polish or whatever.  Some yellow or darken the color.  Water based and lacquer or Deft tend to go on clear.  Just don't forget that top finish.  

On this prototype a plastic coated eye hook is screwed into the bottom edge of the top to pass charge cords through so they can hang ready to use.  The threads screw into a square nut embedded into a slot on one side.  I made sure at least one end of the charge cords can fit through the eye hook center. The slot for the nut would be covered by a wood plug cut on the CNC to match the slot shape. For students a hook to hang a purse or backpack onto might be a good addition to this project. 

See Tiny Table 2, Tiny Table 3, and Tiny Table 4 for a few alternative variations.

Some related educational articles:

Tiny Table 2.

Tiny Table 3.

Tiny Table 4.

Joinery box.  Not about a box.

The Lathe.

Learning Actual Project Costs.

Material Sample Blocks.

Making Projects vs. Making Samples.

Tool Names and Functions.

Woodworking Education: Tiny Table 2

Creative variation opportunities. 

Design students usually strive to be and are encouraged to be unique.   Making the same exact thing as your classmates, just to learn a bit of woodworking, is potentially boring.  With permission to make this final beginning workshop project an expression of their own creativity, a few requirements have to be set so they don't get carried away and miss what they should be learning. 

Tiny Table 2 is simply an aesthetic alternative to Tiny Table 1. Another example for the final beginning workshop project.  All parts differ, but both tables use the same joinery connections between legs and stretchers. Table 2 won't have leg top tenons piercing the top, but instead use one of two standard hardware strategies to attach table tops.  Students are also encouraged to "sign" their work, and the 4DT initials (below) shows one way/place to sign it. Fill the engraved initials with tinted resin then sand flat to the table top. Any scratches that appear in the resin from sanding will disappear once a finish is applied to the top.  

Top Profile

Underside 3D Shape

The stretchers in Table 2 run around from leg to leg rather than cross in the middle.  They attach near the top of the legs, but then have stretchers attached in their middle that cross (half lap) under the table top.  This is where connections to the top are made. These middle stretchers may French dovetail into the side stretchers. When connected to the top they transfer load to the side stretchers.  The legs take the load from the side stretchers to the floor. 

This table is another example of detail continuity throughout the design. The leg profiles visually extend the corner shape of the top down to the floor.  More specific details can be realized and added after the table parts are rough assembled. How the feet meet the floor is one area for consideration. 

Leg cross section.

The outer stretchers have a shallow cove that matches the inward curve of the table top sides.  Bottom and top edges of the outer stretchers are rounded like the underside edge of the top. 

Bottom and Top Edge Curves

Face Contour Matches Top Edge

Even though the assembled dimensions of all tables will be the same, and all will include mortise and tenon joinery, half lap joinery, and potentially more depending on their design, the range of solutions is practically infinite.  Both also demonstrate how to glue up material for their tops, and process the glued up blank down to a finished table top.  The final step for all tables is to sand parts smooth and apply a durable finish. This is best done before assembly but requires taping off any area that is part of the joints between parts.  Then comes glue-up/assembly.  It is the continuity of details that adds to the story you can tell about this table.  That story is what makes the design memorable and desirable.    

Some related educational projects:

Tiny Table 1.

Tiny Table 3.

Tiny Table 4.

Making Samples vs Making Projects

The Joinery Box.  Not About a Box.

The Lathe.

Material Sample Blocks.

Tool Names and Functions.

Determining Actual Project Costs