 |
| A Clean Design. |
There are many a-frame saw horse designs out there. Each time I see a YouTube video of someone making saw horses I think there should be a simpler way to make one that is also better in at least a couple ways. A-frame designs want to spread out when loaded and as such most designs use a chain or shelf to keep that from happening. Others resist the legs spreading with a metal or plastic or plywood bracket/flange to connect the parts at the top.
By simpler I mean no chains or brackets or hinges or shelves to keep the legs from spreading apart. Two common bolts with nuts is all that is needed to hold the base halves together at a critical point to make this design work.
By simpler I mean no more than 2 unique parts (legs and stretchers) to make the base with a common 2x4 or 2x6 to serve as the top bar.
The design takes advantage of gravity to grip the 2x4, and also has the options of bolting the 2x4 to the base or simply trapping the 2x4 to the base. As gravity pulls the load on the top down, the legs try to spread but are prevented by the 2x4 which the legs simply grip harder.
My sawhorse can fold up.
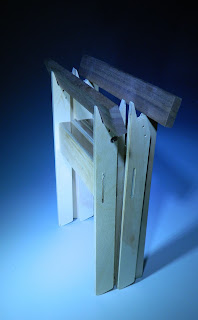 |
| Folded and Standing. |
Two or more can also stack atop each other for a minimum storage footprint.
 |
| Stacked Neatly. |
Mine comes as flat parts to be assembled, and can disassemble back into flat parts. Flat parts box easily and are efficient to ship and take less room stacked on store shelves than assembled sawhorses would.  |
| Flat parts for two sawhorses. |
When opened up the legs can optionally be locked in position with secondary bolts.The 2x4 can optionally be bolted to the frame.
All parts can be cut from 18mm or thicker plywood using a CNC, and a single router bit can be used for every detail of the design including countersinks for the bolt heads and mortises for the tenon ends of the stretchers.
The stretchers between the leg sides can be connect at least 3 ways:
1. A slip through and push down joint that wedges them snug with no hardware.
2. Use an embedded nut or cross dowel with a machine screw through the legs to stay snuggly attached in use.
3. Lastly the stretcher tenon ends can be glued into mortises cut into the legs.
My 1/4 scale model of this design is shown in the photos above. It works as intended, but lacks the final fine details possible with a full sized model.
Using a 34" x 24" scrap of 3/4" lumber core birch veneered plywood I made 4 legs and 2 stretchers to build a sawhorse base for my small Cutech jointer. A piece of poplar that was 1.5" thick works as the 2x4, and attaches to a top made of oak that the jointer rests on. The jointer bolts onto the oak top. The top fastens to the poplar rail. The poplar rail is screwed to the back legs of the stand. It could optionally be also screwed to the front legs to completely lock the geometry of the base.
Shorter versions can be used as base legs for tables or desks. A bit taller and they could be used as legs for a workbench/layout table.
If you have a CNC, a 30" x 20" piece of 3/4" nominal plywood is enough for all the parts of one desk leg sawhorse. Double that for two. These would hold up a 24"x48" butcher block top. Provide your own 2x4 for the top rail(s), or tweak the leg shape a bit and you could use two slices of the same plywood as one top rail. Glued together they would be just a bit thinner than a 1.5" thick 2x4. 3/4" plywood is rarely 3/4" thick in actuality.
4D


