Search This Blog

Sunday, August 21, 2022

Parsons Table. A Simple Plywood Table

One of the most frequent inspirations I have for designing and building a project is the presence of scraps of wood left over from a previous project. I use a lot of Baltic birch plywood, and had several roughly 2" wide strips of 12mm plywood left over from a cabinet project.  Those scraps were begging to be made into something useful. 

I appreciate the simple beauty of the classic parson's table. Creating one from wood usually requires careful mitering of pieces and challenging clamping for assembling. There is also an inherent weakness in simple miter jointing.  Strength requires the reinforcement of a splined joint, biscuits , or a locking miter cut done with a special router bit. All of that, to me, is too much work for left over scraps of wood.  A simpler approach was necessary. 

Simple
My plywood table.  Butt-jointed left over plywood scraps, this Parsons table is the end result of my simple approach. 

The strength of this table lies in the interlocking of pieces at each corner of the table.  The beauty lies in how beveling the corners balances each face and eliminates the distraction of the plywood's joint line.  It celebrates the plywood's edge. 

Beveled Outside Corners
This table is 18" square and 20" tall.  The 20" square glass top finishes it off. The green tint of the glass compliments the green color of the base. Four small silicon buttons keep the glass from sliding around. 

Sixteen strips of 12mm plywood were required to make this table.   Eight were 1.53" (38.8mm) wide.  The other eight were 2" (50.8mm) wide.   Glued together the legs and top frame are 2" x 2".  

Top Plane

Top Frame

Legs

I cut a 1/8" deep recess in the top for a piece of 1/8" thick glass to sit flush with the frame top. Before getting a piece cut to fit I realized I had a 20" x 20" piece of glass on hand. The table looked better with that glass sitting atop the base so it won that job. 

This table ended up being a great use for some plywood strips. The top corners have a void and the light colored filler is a 3D printed piece of wood filled PLA, Once I find (or buy some more of) the paint I used for the base I'll touch up the corners to match.   

Questions and comments are encouraged.

4D 

Friday, August 19, 2022

Desk and PC Cabinet. An Ancient Project

 In the years before flat LCD monitors came to be we had boxy analog CRT monitors to view the content of our computers with.  Over the years I designed and made several desks and cabinets to hold the PCs and Monitors and Printers used. Most had some cable management built in. The cables needed then are still the cables needed now and have always been the eyesore that came with PC use. 

When I was in grad school in 1987 I designed this desk/cabinet for myself. It was a challenge to hide away the aesthetically distracting PC parts but make them available when needed.  

Antique Computer Cabinet
This photo is the only surviving evidence of this project. The project was on display at the 1988 IWF Design Emphasis competition where it won first place in the graduate category. The drawer with the PC front showing also holds the keyboard that can be pulled out and placed on the desktop.  The monitor can close up flush with the cabinet face when not needed. A hinging up top door and another door from the side can close down to hide the dot-matrix printer. A shelf below the printer held paper to feed into the printer through a slot above.  

Monitor and printer cables are thoughtfully routed through the hollow left post that supports the upper cabinet. They arrive in the rear of the lower cabinet to plug into a power strip or the rear ports of the PC.  There is a rear panel that pops out to access the rear of the PC and all cable connections.

The desk top and cabinet panels are birch veneered plywood. All edging was hard maple. The desktop is a 5' section from one 8' long piece.  The 3' section left became an alternate top that could replace the long top for a more compact installation. Both used snaps on their end to snap to the cabinet posts. The smaller top didn't need a leg support and would simply cantilever off the cabinet edge.  

The leg post under the desk top was turned on the lathe. It started as three 120 degree sections so tapered slots for the feet could be routed out before being glued together to turn. The feet wedge into these slots and support the post a couple inches off the floor. The post top sockets into a lathe-turned flange screwed into the bottom off the table top. The post with feet could be rotated to point any direction The post and feet come apart easily from the top and each other to make it much simpler to transport. 

The bottom of the posts had wheels attached. With the desk top detached the cabinet could be tipped back and wheeled around. The PC parts inside could remain connected while being moved. A single plug to external power was the only visible cable to deal with. 

This cabinet with the smaller top lived at a sister's home for a few years. It held her computer, monitor, and printer.  When she didn't need it anymore I retrieved it. 

The cabinet was taken apart several years back and the pieces have provided material for other projects.  

I still have the large table top. It replaced the cheap plastic table top of a folding table and has become a project table I can set up when needed in my shop. Legs fold up and the table stores standing flat against a wall. 

Questions and comments are encouraged.

4D 

Thursday, August 11, 2022

A Folding Lounge Chair

Fit. Red oak,  Cherry Stain
This chair I designed and built in 1981. I call it my Fit Lounge.  Look up the word "fit" for a rounded out description that very well matches the chair's features. 

Dictionary.com: Fit

Fit is a good example of 4th dimension design.  For most of its life it stands still and ready.  Welcoming me in for some time off my feet.  Several times in its life it has folded up flat for easy carry and compact shipping. 

4th Dimension Design.

The cushions are supported by canvas.  Under the seat the canvas is stretched drum tight using two aluminum bar cam levers. Originally the cam levers were made from oak. Not being sure how long the oak levers would last I replaced them with some 1/4" thick aluminum bar stock.  Through the cushion you never "bottom out" and feel a hard surface.  During shipping/moving the cam levers can release the tension to let the canvas relax.  The back canvas wraps around the top rail, runs over two elastic straps, around a 1" dowel to the low base stretcher between the back legs. It runs around that stretcher and with sewn in Velcro strips it sticks to itself. When the chair is folded up the path for the back canvas is a little shorter, easing tension on the back straps.  The back straps add a flexible lumbar contour to the back cushion. Much more comfortable than a flat plane. 

Canvas Support

Pivot points between the seat and the outer frame have a 1/16" thick nylon washer to keep the wood from rubbing against wood.  The black bracket is 1/16" thick aluminum plate sprayed black for contrast.  If I made a new one I would have the plates powder coated. The cushions have been recovered twice, and are due for one more update. Perhaps with leather this time. 

Folded up it is four inches thick with cushions removed.

All outer edges are rounded over.  A friend volunteered to model it for me.
Gretchen
Fit won 1st place in the summer casual furniture category at IWF's Design Emphasis competition in 1982.  I mentioned to the judges that I also had a redwood version that I took out to my deck when the weather was nice.  Because it folded up flat for easy carry it was easy to take in and out.  

Fit has proven its durability and usefulness.  It has been my favorite landing spot after a hard day of work for 41 years. 

Questions and comments are encouraged!
4D

Sunday, August 7, 2022

CNC Efficiency: Tenon Cutting

Over the last decade or so I've been cutting joinery on my CNC for college student furniture projects.  Often the job is simple straight end tenons with the part clamped vertically.  It took just a few experiments to find the quickest and cleanest strategy show in the video below.


For a clean shoulder I used a spiral upcut router bit, running clockwise for a climb cut. This way the fibers are sheared off rather than pushed out. 

The 1/4"diameter router bit has 1" of cutting height and in normal profile or pocket cuts uses 1/2 of the diameter (1/8") for each pass.  That leaves 7/8" of  sharp edges that are rarely used.  A little math to calculate the area being cut in a normal profile pass and you get .25" x .125" =  1/32sq.in.  For a stepover pass that uses 40% of the bit width that area is even smaller at  1/80sq.in. So long as the area being cut off remains between those two the depth of cut and stepover width can be changed. 

For a 3/4" tall tenon 2 passes at 3/8" depth (rather than 6 passes at 1/8" depth)  reduces the time spent running around the tenon by 2/3. To keep the cut area under 1/32sq.in the stepover should be no more than 1/3 of the bit width. 1/16" width is a safe amount for a 3/8" deep pass.  Roughly 1/43sq.in. per pass.  The whole 3/4" depth could be cut in one pass if the stepover was only 1/32". In that case the chips produced tend to be 3/4" long fibers and are more challenging for a dust collector. That is the reason I make the pass depth 3/8".   If your CNC has some backlash/play you can run a conventional counter-clockwise final cut around the tenon to trim off any not cut by the climb cut.    

Another variable is feed speed.  The short lengths of the tenon sides self limits the speed of the bit travel. Acceleration/deceleration between nodes never reaches the feed speed set. This is true for the small Probotix CNC I use. For beefier and quicker CNCs I'd set feed speed to 100ipm. 

If you are using a larger diameter bit then the stepover and pass depth can be even larger. Do the math to verify you are still getting good chip removal. A 3/8" bit, taking 3/16" deep passes for a profile cut removes 1/14sq.in. as it moves forward. Making a single 3/4" deep pass taking off 1/16" is 1/22sq.in. removed.  Easily managed by the 3/8" bit. 

This strategy also works when the tenon is being cut at any angle up to 20 degrees or so from vertical. For woods that tend to split easily a smaller angle limit is recommended. 

Questions and comments are encouraged!

4D    

Saturday, August 6, 2022

Knock Down Panel Joinery: Tusked Mortise and Tenon

Tusked Mortise and Tenon
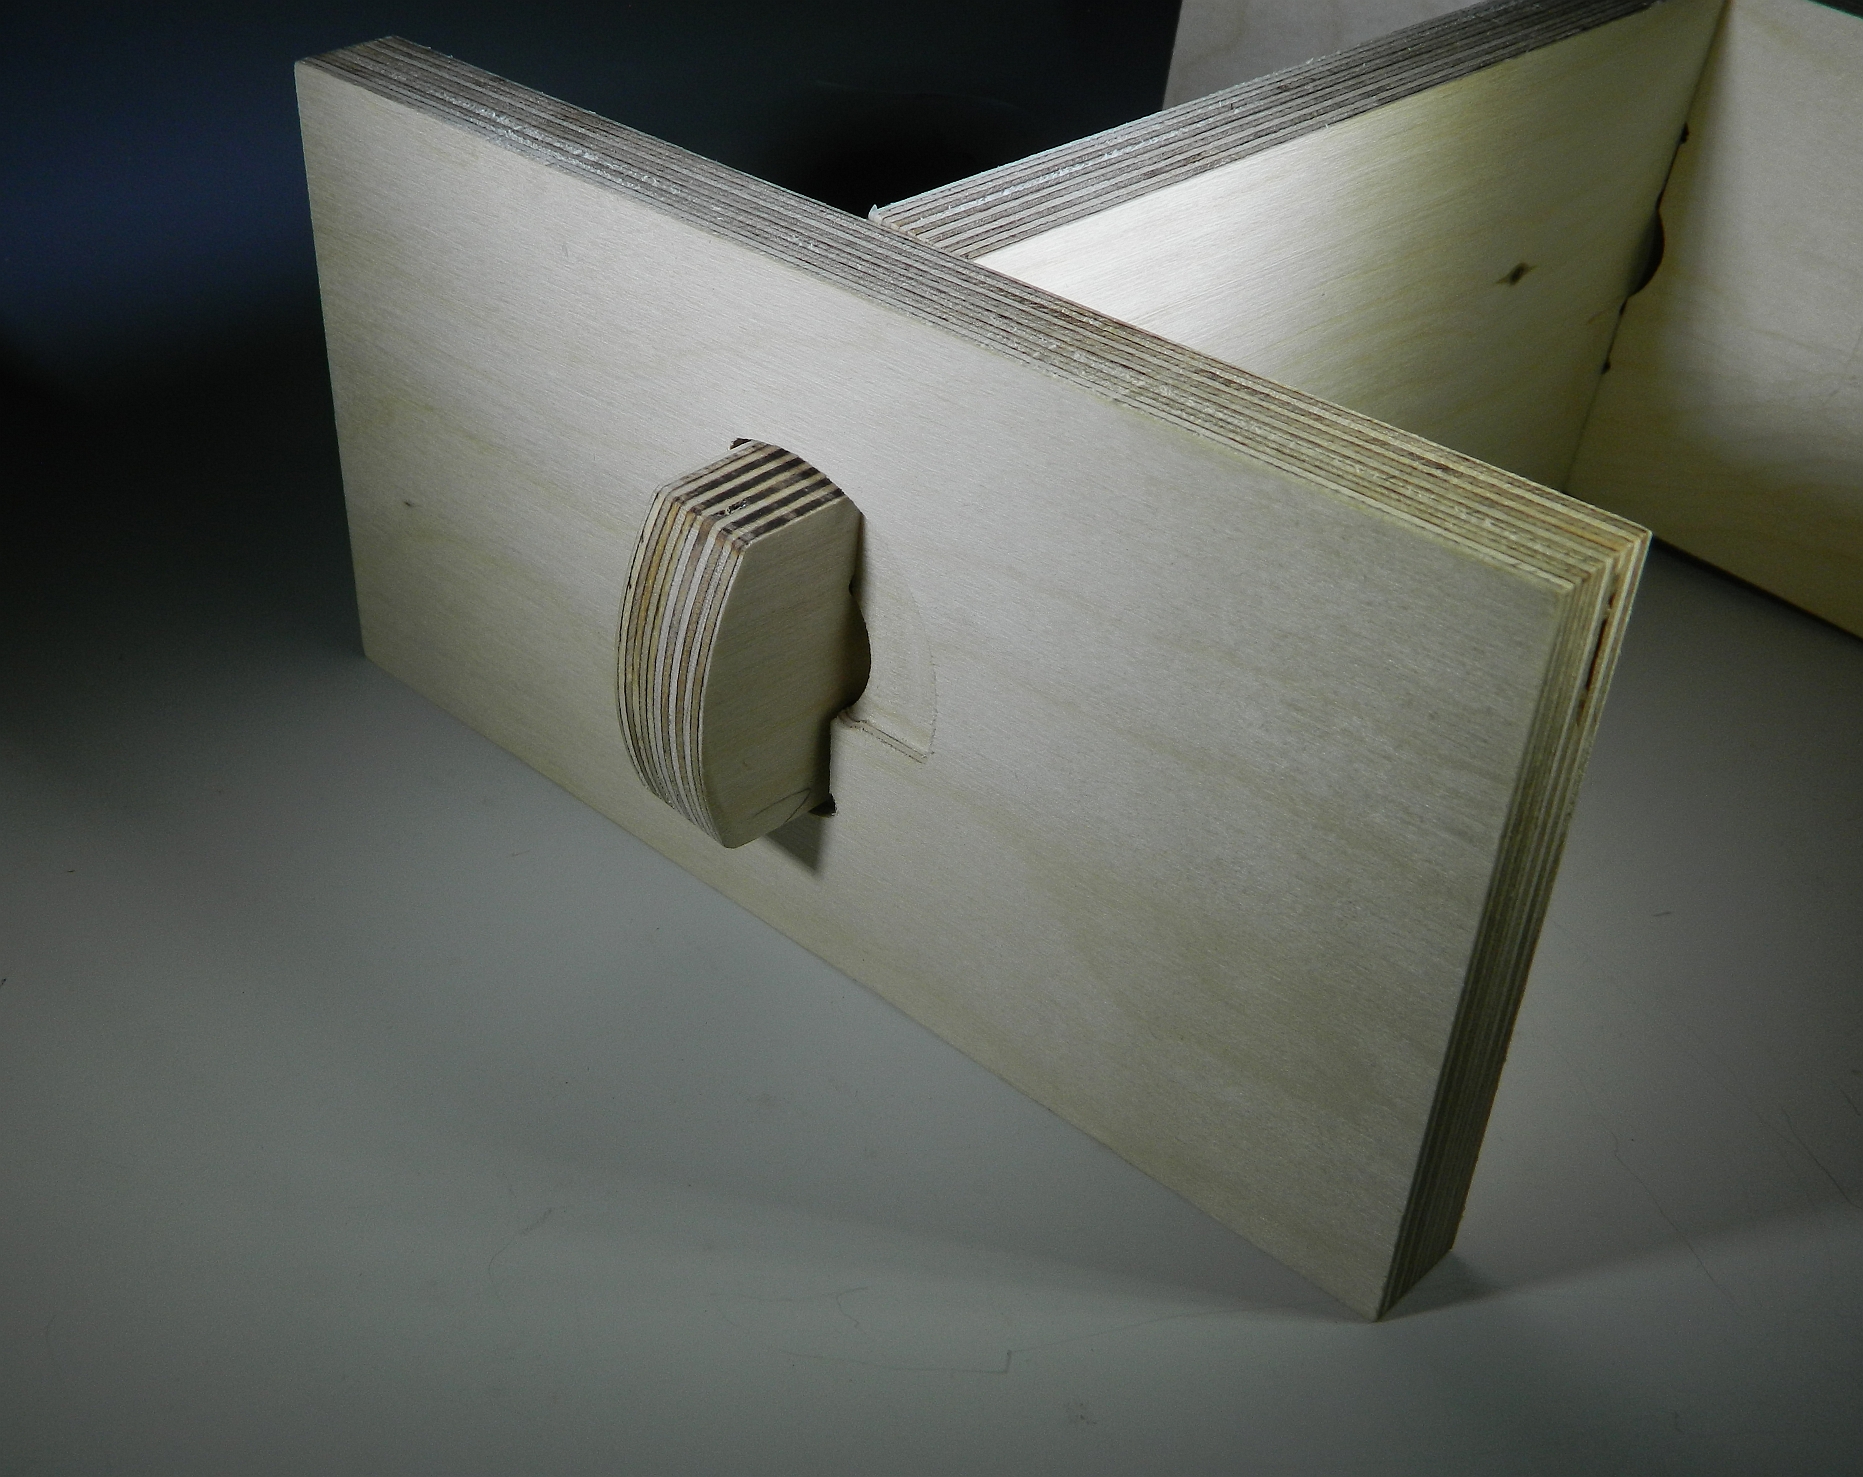
This is another CNC cut panel connection, It is a variation of the more classic Through-tenon with a wedge pin often used on trestle bases of dining tables or workbenches. I made this sample to show my Workshop 2 Furniture Design students as one option for their knock-down furniture design assignment.  
The Wedge and the Slot 
Both the wedge and the slot for it were cut out on my CNC.  The inside face of the slot is sloped to match the slope of the wedge.  The fluting toolpath in Vectric's Aspire or V-Carve software made easy work of the slot's inner slope. 
Tenon and shoulder
The shoulder of the tenon has a dogbone cut to account for the inside corner which a round router bit can't make. I added a 0.003 allowance to the slot for the tenon for a nice slip fit. The slot for the wedge has room for the wedge to pull the tenon tight against the back of the joint.  Sloping that slot to match the angle of the wedge face makes a high friction interface that stays very snug with the wedge tapped in. A tap or two on the bottom of the wedge will pop it free to make disassembling the joint quick and easy.  

Comments and questions are encouraged!

4D

Friday, August 5, 2022

Knock Down Panel Joinery: The Twist Tenon

Twist to Lock Tenon
For the Workshop 2 furniture design classes I taught I had the students design and make furniture that could quickly assemble and also knock down (come apart) easily. 

Most woodworking joinery is not designed to come apart repeatedly. This CNC cut twist tenon connection does slip together easily and once twisted 90 degrees locks the parts together securely.  Twist the other way to allow pulling the parts apart. 

Twist 90 degrees to align with the center slot
This example is a snug fit with only a few thousandths clearance between tenon and the slot it slips through. When twisted the fit is still snug, but could be improved by adding a slight ramp to the twist surface on the end panels. That would have the twist action wedge tighter as it turned.  The fluting toolpath in Vectric's Aspire or V-Carve software could handle the ramping. 
Once apart all pieces store flat.
Using this joint a simple table could be made from 4 panels. The center panel would have tenons on two sides and the top. Rotate the sides onto the side tenons, then rotate the top onto the top tenon.  With the top in place it would prevent the sides from rotating. A double thick top could have the top tenon recessed flush when assembled. A couple of spring loaded pins could lock the top to the sides as it rotated into position. 

Comments and question are encourage!
4D
 

Wednesday, August 3, 2022

Yahtzee Board. A Classic Project from my Past

Yahtzee Playing Tray
Yahtzee is a dice game that can be played by 2 or many people at the same time. Players take turns throwing the dice and hoping to see a useful set of numbers they can mark as found on their scorecards.

Yahtzee Scorecards at Amazon.com

On the web you can also find scorecard images you can print out for yourself.  Instructions for the game are also available: Wikipedia

My Grandfather made this playing tray for his grandkids to use when they visited.  24.5" long x 15.625" wide, and 3.5" tall. The carpet floor softened the sounds the dice made when thrown. The sides kept the dice contained.  It was a great success and helped keep family members entertained and together for some fun. The carpeted bottom  I'm sure was Grandpa's ode to silence, something I'm sure 6 noisy grandkids made difficult to find.  

Corner Detail
I live alone now, and am hoping one of my siblings might want this tray.  I'm tempted to make a new one from some hardwood and with no duct tape or paint, although I doubt I can improve upon the joy Grandpa endowed into his version. 

Comments and questions always appreciated!

4D