Having taught furniture design to college students for the last 45 years or so, it became clear over time that fewer and fewer college students arrived with any fabrication experience.
This joinery box project is not about being a box, but rather a great project to show beginning students many fabrication processes and tools. Demonstrating tools in the process of making parts for a standardized project kills two birds with one project. Students end up with a project they can use and are motivated to complete. Rather than making scraps to see a tool in action, students learn the logical sequence of tools/processes required to get from raw materials to their finished project parts.
This project has evolved each year to become an efficient way to teach the students many basic fundamentals. When done with their box, and a few other similar basic projects, the students are then equipped to design and build sophisticated furniture projects with little need for build input from their instructors. Students learn several processes on the way to making something they are personally interested in having. The joints learned here will come in handy when students tackle designing case goods. Making joinery samples alone is no better than having the student draw up or just find photos of joints. Making the joints for a useful project also teaches them an application and how to size or alter/adjust the joints for that application.
You can use this project to introduce many tools to the students. Those include the Jointer, Planer, Table Saw, Crosscut tool options, Bandsaw, Drill Press, Assorted drill bit types and their uses, plug cutter bits, Routers both hand held and table mounted, vacuum pump and bags, several sanding tools, Biscuit Jointer, and the CNC.
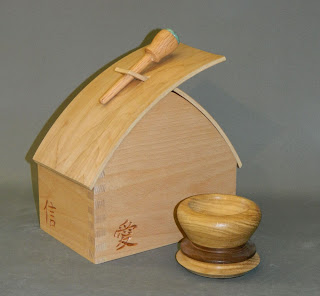
The box is made from any 4/4" thick hardwood blank at least 32 inches long and any width 4" or more. It has a unique corner joint on each corner. Miters reinforced with a spline, a rabbet joint reinforced with countersunk screws covered by plugs, a finger joint, and a simple rabbet/dado joint. The sides are 6" x 9" outside, with 5/8" thick walls and a 1/4"(6mm) or 1/8" (3mm) thick plywood bottom. A laminated curved panel is added, and integrated into the design by the student. Some simple CNC engraving is also required, so the students learn how to generate a CNC ready vector file.
 |
| The basic box corners. |
3. The blank is then ripped to a consistent parallel width using the table saw. This is a good time to mention/demonstrate the tenon jig, miter gauge/sled, dado blade sets, cove cutting, table saw safety, etc..
4. One end is checked for square. This is a good place to show students the many different squares and the unique features of each. If the end is not square then it is trimmed square to the sides. (compound miter saw, radial arm saw, or table saw with miter fence)
5. Students calculate out (and hopefully record to remember) how long each box side needs to be to account for the joinery that will be used. (A great excuse for having an example box for them to examine)
 |
| Board Layout |
Renderings shown are created by my CNC software and don't necessarily show the wood grain running the best direction. Normally the grain would wrap around the box sides rather than from bottom to top of the box sides
6. Starting from the squared end, box sides are measured and marked, cut, then measured and marked again before cutting the next piece. Adjacency of pieces should be kept track of as grain patterns look nicer when they flow around a mitered corner.
 |
| Student example. Curved lid. |
7. The table saw (with miter fence) is the best tool to cut miters on the mating ends of two adjacent box sides, If not more than 5" high or so the miters can be cut standing up or laying down on a compound miter saw.
 |
| Splined Miter |
 |
| CNC cut plank texture shown. |
9. A table saw with a dado blade set installed, or a router table with a 5/8" or wider flat bit installed can be used to cut a 1/8" deep rabbet, 5/8" wide, on one end of one box side. A backer board is recommended to prevent tear-out when cutting across end grain on the router table.
 |
| Shallow rabbet |
10. The drill press is used to drill a 1/8" deep 3/8" diameter counterbore for flat head screws that will reinforce the shallow rabbet joint. Holes are centered 5/16" from the end. Two or three screws can be used depending on the width of the board. This is an excellent opportunity to demonstrate the drill press. Show students how to select and install the appropriate drill bits for the screws being used, select proper bit speed, adjust the table height and angle, set depth of cut, etc.). This step is not about the joint. Selecting drill bits and learning the drill press in context is the point.
 |
| Screw Holes for the Rabbeted End |
11. Drill a shaft hole for those screws. You don't want the screws used to cut threads in the outer piece.
12. Drill a pilot hole for the screw threads in the end of the mating box side. Mark through the holes drilled in #11 above. Verify that the marks are 5/16" from the edge. Centerpunch, then use a hand drill or the drill press with the appropriate bit. A vice can be used to hold this board upright on the drill press table.
13. The drill press can also be used with a plug cutter to make matching or contrasting dowel plugs to cover the screw heads after the box is assembled.
 |
| Interlocking curved tops. CNC engraving shown. |
14. Finger joints (aka box joints) can be made using a fixture set up on a router table with a 3/8" or 1/4" spiral end mill. Optionally a box joint jig could be made for the table saw and dado set, or the CNC could be used to cut them with the parts clamped vertically. Using the CNC the width and spacing and even shape of the fingers can be changed. Pseudo Dovetails. Finger Joint Fixture
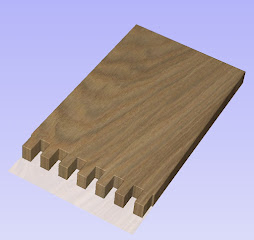 |
| 3/8" Wide Fingers, Centered |
 |
| Mating Fingers |
15. A minimum of 3 pieces of 1/8" thick bending plywood are then glued together over any existing form to create a curved plane after being removed from the vacuum bag. Students then decide how to use this curved plane in or on their box. Several tools may be used to reduce the raw curve to the needed part of their box. Optionally some hardwood could be re-sawn into thin strips (band saw, horizontal drum sander), then bent and clamped over a curved form with glue between strips to make a handle or box divider or even one curved side of the box. Specific details of the box may change depending on how they want to use the curved plane.
 |
| Laminated Curve |
 |
| Hole pattern was CNC cut before laminating the insert lid curve. |
Now that students have designed something to be CNC cut they are required to learn about toolpath creation, using the control software for the CNC, choosing and installing the needed router bit for their job, clamping down their box side securely making sure the clamps used won't interfere with what the CNC will be cutting, and then loading/zeroing out/then running the CNC file to cut what they designed.
17. For the 1/4" (6mm) plywood bottom a 1/4" wide slot is cut 1/4" up from the bottom inside edge of each box side. Some sides will need a stopped slot, and some can have the slot cut all along the edge. No slot artifact should appear on the outside of the box after assembly. Best cut with a 1/4" end mill in a table mounted router. Careful attention should be made to make sure all slots are on the inside bottom edge of each box side. Students could alternatively use 1/8" (3mm) plywood and a 1/8" end mill given the small size of this box.
18. A tongue and groove joint is the last corner on the box. Both sides can be cut on the router table with just slight changes to the setup. Cutting across the end grain a backer board is advised, as otherwise the grain may tear out or split off. This joint is a good simple choice for the corners of drawers.
 |
| Rabbet/Dado |
20. The box sides are glued up. Any glue spill-out is relatively easy to clean/wipe/peel off a finished interior surface.
21. A handheld trim router with a chamfer or small round-over bit can be used to soften the sharp outside corners of the box. Alternatively the sharp edges can be softened with a few strokes of 180 or 220 grit sandpaper on a sanding block held at 45 degrees to the edge.
22. Outside faces of the box are sanded and finished after the box is glued up. This delay is to account for outside damage that may result from clamping together the box.
This joinery box project is not about being a box, but rather a great project to show students many processes. Both how they are done and why they are used. To reinforce the students knowledge about the processes and joints used it helps to test them about the tools used, sequence of steps, and names and look of the 4 corner joints.
While this isn't a furniture project, the joinery box is a low risk high yield beginning project. It gives students a deep understanding of many fabrication processes and sequence logic for complicated projects. Success with this project gives them confidence about their abilities to do well. It reduces their trepidation toward starting more complicated and more risky/expensive furniture projects. It reduces the need for instructor help in the future classes.
Other educational woodworking projects:
Making Samples vs Making Projects
Calculating Actual Project Costs.

No comments:
Post a Comment