Search This Blog

Showing posts with label table design. Show all posts

Thursday, June 23, 2022

Scraps. A Window Table made from Assorted Workshop Scraps.

Scraps
This table came to be from my desire to use up some assorted material scraps I had in my shop.  A vinyl wrapped particle board 18" wide shelf scrap became the table top.  A scrap of hickory that used to be one side of a wall mounted shelf became the drawer front. The angled ends of the drawer front inspire angling the ends of the back stop above for some detail continuity. The knobs on the drawer front are located where there were two screw holes to cover. Some old growth pine was used to cover the edges of the base which was made from 3 pieces of cheap plywood. The cheap plywood was painted black to diminish it's visual impact. 
Smooth running drawer.

The drawer hardware rollers were salvaged from old cassette tapes.  A Teflon spring loaded guide t-pin was embedded into the back edge of the drawer to run in a t-slot and keep it from racking when pulled out or pushed in. 

The top of the base sides slide into dovetail slots in the bottom of the table top. The center panel slides into dovetail slots on the inside faces of the two sides. This table can be quickly disassembled for relatively flat storage or moving/shipping. 

The construction is simple.  The details make it look more interesting.  A nicer version could be made from solid wood rather than MDF and cheap plywood, but wouldn't be any more useful.  I had this table on display in a gallery show of my work and was surprised how much interest it attracted. 

Without all the detail the 4-plane assembly (2 sides, a center plane, and a top) is a quick and simple way to make a table (of nearly any size) from sheet goods. The center slips down dovetail slots in the sides. The sides slide into dovetail slots on the underside of the top. 

24" x 24" x 24" four plane table
With some thoughtful reflection even a pile of scraps can become a nice looking useful little table. 

4D

Comments and Questions welcomed and encouraged!

Tuesday, April 12, 2022

Woodworking Education: Tiny Table 1

Tiny Table 1

A Lesson in Wood Fabrication and Joinery

Teaching furniture design to college students who have no prior experience with fabrication techniques requires showing them examples of how to turn raw materials into finished furniture. 

Tiny Table is a final project for the beginning workshop class to teach them common wood table joinery. It also shows them all the steps needed to get from raw wood to finished parts that make up the table.  It is best to have students all work though the required steps to build their own version. It gives them motivation to do a nice job, and they end up with something they can use. In the process of making their own they also learn about the tools they will be using.  That and the typical joinery used as well as how to make the required joints.

The project is also a lesson about and demonstration showing the continuity of details possible.

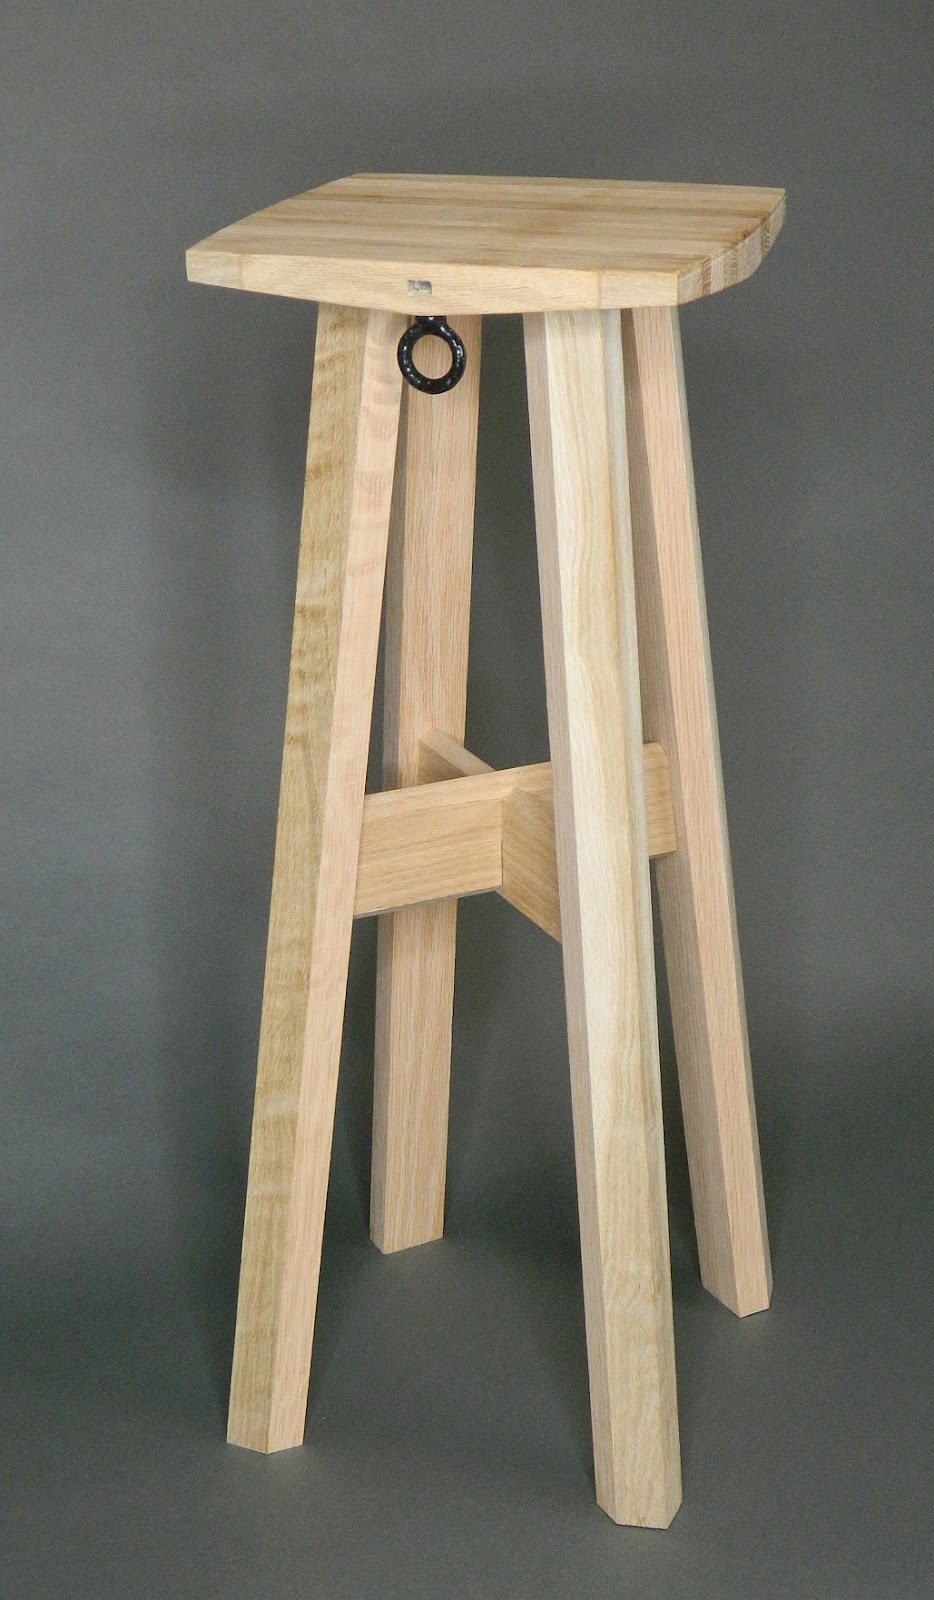
All tiny tables are 24" tall and have a top that is 9" x 9". Mainly to keep costs low, and provide an interesting category of furniture to design for,  All students will confine their designs to these dimensions.  There are 3 other tiny table examples with links to them below. 

A tiny table is intended to stand next to a desk by your chair and provide a dedicated spot to charge your phone or smart watch or rest your mug of coffee or other drink of choice. Intended to serve as a place to charge your phone, this table top could potentially have a wireless charge coil embedded or at least some clever allowance for managing charge cords.  This table could also find many other places in your home to live.  

The 4 legs are connected by crisscrossing stretchers and attaching to the 9"x 9" top.  The underside of the top is 3D carved to meet the slanting legs at 90 degrees as they approach at an angle other than 90 degrees.  While on the CNC the perimeter shape can also be cut. If a wireless charging puck is to be used, then a precise pocket for it and a slot for its power cord can also be cut on the CNC.  For this Tiny Table project all students will design, create toolpaths for, and cut out their own table top using the small CNCs.  

Underside CNC carved

For this example, the top is a square with bowed out sides. This leaves the corner angles a bit larger than 90 degrees.  

Top profile
The outer bevel on the legs were cut to the same angle.  Legs connect to the table top one of two ways depending on how the wood of the top was glued up. Figure 8 connectors can be used if the top surface is face grain and prone to expand/contract over time. If the top is quarter sawn or rift cut then tenons on the top of the legs can join into mortises cut in the angled surfaces of the top underside.  Figure 8 Fasteners

Table leg. Outer bevel matches table corners.
The top and bottom edges of the stretchers also have beveled edges that match the top corner angle.  The stretchers are offset from each other so the bevels aren't interrupted when they pass.  The first stretcher bevels pass over the opposing stretcher.  On the opposing stretcher they appear to run into/through the first.  Offsetting intersecting stretchers adds some interesting aesthetic variation and encourages doing something interesting with the top and bottom edges of the stretcher. Two diagonally opposite legs have the mortise for the tenon a little higher than the other two legs. The two stretchers are not identical. 
Top and bottom bevels matches leg bevel

Renderings in this article are from my CNC software and don't necessarily show the proper orientation of the grain in the parts.  Grain direction in the stretchers should run from tenon end to tenon end. 

This tiny table teaches students how to properly size and make mortises and tenons, as well as layout and cut a halving joint for the crossing stretchers in context. The top and potentially the legs are opportunities to show students how to glue up panels of thick wood blanks from narrow/thinner strips of wood. Reorienting the wood face grain can reduce expansion/contraction by 2/3.  

Not all projects have to look the same, but the base of each should relate aesthetically to their top.  All surfaces of every component are opportunities to add detail to. It is the continuity of details in this project that adds to the story that can be told about the design.  The story that you can tell is what makes the design more memorable and desirable. 

Don't forget about finish.  Some woods accept stain well to alter their color.  Some may look better painted. How about India ink to blacken oak or ash but leave the grain details visible?  Top finish can be oil based or lacquer based or water based or wax or French polish or whatever.  Some yellow or darken the color.  Water based and lacquer or Deft tend to go on clear.  Just don't forget that top finish.  

On this prototype a plastic coated eye hook is screwed into the bottom edge of the top to pass charge cords through so they can hang ready to use.  The threads screw into a square nut embedded into a slot on one side.  I made sure at least one end of the charge cords can fit through the eye hook center. The slot for the nut would be covered by a wood plug cut on the CNC to match the slot shape. For students a hook to hang a purse or backpack onto might be a good addition to this project. 

See Tiny Table 2, Tiny Table 3, and Tiny Table 4 for a few alternative variations.

Some related educational articles:

Tiny Table 2.

Tiny Table 3.

Tiny Table 4.

Joinery box.  Not about a box.

The Lathe.

Learning Actual Project Costs.

Material Sample Blocks.

Making Projects vs. Making Samples.

Tool Names and Functions.

Woodworking Education: Tiny Table 2

Creative variation opportunities. 

Design students usually strive to be and are encouraged to be unique.   Making the same exact thing as your classmates, just to learn a bit of woodworking, is potentially boring.  With permission to make this final beginning workshop project an expression of their own creativity, a few requirements have to be set so they don't get carried away and miss what they should be learning. 

Tiny Table 2 is simply an aesthetic alternative to Tiny Table 1. Another example for the final beginning workshop project.  All parts differ, but both tables use the same joinery connections between legs and stretchers. Table 2 won't have leg top tenons piercing the top, but instead use one of two standard hardware strategies to attach table tops.  Students are also encouraged to "sign" their work, and the 4DT initials (below) shows one way/place to sign it. Fill the engraved initials with tinted resin then sand flat to the table top. Any scratches that appear in the resin from sanding will disappear once a finish is applied to the top.  

Top Profile

Underside 3D Shape

The stretchers in Table 2 run around from leg to leg rather than cross in the middle.  They attach near the top of the legs, but then have stretchers attached in their middle that cross (half lap) under the table top.  This is where connections to the top are made. These middle stretchers may French dovetail into the side stretchers. When connected to the top they transfer load to the side stretchers.  The legs take the load from the side stretchers to the floor. 

This table is another example of detail continuity throughout the design. The leg profiles visually extend the corner shape of the top down to the floor.  More specific details can be realized and added after the table parts are rough assembled. How the feet meet the floor is one area for consideration. 

Leg cross section.

The outer stretchers have a shallow cove that matches the inward curve of the table top sides.  Bottom and top edges of the outer stretchers are rounded like the underside edge of the top. 

Bottom and Top Edge Curves

Face Contour Matches Top Edge

Even though the assembled dimensions of all tables will be the same, and all will include mortise and tenon joinery, half lap joinery, and potentially more depending on their design, the range of solutions is practically infinite.  Both also demonstrate how to glue up material for their tops, and process the glued up blank down to a finished table top.  The final step for all tables is to sand parts smooth and apply a durable finish. This is best done before assembly but requires taping off any area that is part of the joints between parts.  Then comes glue-up/assembly.  It is the continuity of details that adds to the story you can tell about this table.  That story is what makes the design memorable and desirable.    

Some related educational projects:

Tiny Table 1.

Tiny Table 3.

Tiny Table 4.

Making Samples vs Making Projects

The Joinery Box.  Not About a Box.

The Lathe.

Material Sample Blocks.

Tool Names and Functions.

Determining Actual Project Costs


Woodworking Education: Tiny Table 3

Three Legs Under a Triangular Top.

This 3rd example for the final beginning workshop class is to show students both the joinery needed to make it, as well one alternative to 4 legs for this final beginning workshop project.  It is also another example of detail continuity throughout the design. 

The table is made from 4/4 thick (approximately 7/8" actual) face grain white oak.   For the top the oak was ripped into slices 1.125" wide, then tipped 90 degree to be glued up into a 1.125" thick panel. Doing this reveals a more interesting quarter sawn view of the wood grain, and reduces width expansion/contraction by roughly 2/3.  After glue was dry the blank was scraped flat on one side, then sent through the planer (or horizontal drum sander) to clean up.   It ended up 1.0625" thick. The CNC was used to carve the bottom face and cut out the profile.  A trim router with a small 1/8" round over bit around the top edge followed.  

Still fitting within a 9 inch square, the CNC carved bottom face reveals it will connect to a triangular center post.  

Bottom Side.  CNC Carved


Top Side.  Rounded Edge

The center post won't extend down to the floor, but rather just far enough to connect to stretchers extending from 3 legs.   The center post may be made from one solid (or glued up) block using the rotary axis, or 3 pieces mitered together with a void in the middle. 

Center Post Showing Top Tenons.

Tenons cut on the top will match and slip into the mortises cut in the bottom center of the table top.  Three tenons rather than a single center tenon have more glue contact surface area, Spread the load closer to the post perimeter, and have bridges between them to weaken the top less. 

The legs stand on the floor, but don't extend all the way to the top. The leg outer profiles matches the corner shape of the top. Their top edge is notched to match/echo the underside shape at the corners of the top above them. 

Leg 


Inside Mortise

The section view of the stretchers is another opportunity to tie details together in this design.  Rather than with a simple rectangular section, a triangular shaped stretcher could be used.  The tenon shape can also echo the stretcher shape.  Just make sure the mating mortise matches the tenon. 
Triangular Stretcher Option

For some technical variety one could make the center post from 3 mitered pieces. Then use the center void as a wire chase to feed power to an embedded table top wireless charging puck. The wire chase could continue though one stretcher that is glued up from two halves that have a groove running down their middle.  A leg made from two halves could also have a wire chase from the stretcher down to outlet height.  Just make sure the cable is in place when stretcher and leg halves are glued up. 

In summary this project encourages students to think beyond rectangular shapes.  It teaches them how to make more interesting 3D shapes for furniture parts using the technology available.  It opens their minds to think about propagating details throughout a design to aesthetically tie all the parts together.  It lengthens the story that can be told about their design. It is this story of the design details more than a quick glance at it that makes it memorable and desirable.  

Some related educational projects:

Making Sample vs. Making Projects.

Joinery Box.  Not about a box.

Material Sample Blocks.

Tool Names and Functions.

Tiny Table 1.

Tiny Table 2.

Tiny Table 4.

Calculating Actual Project Costs.

C

Woodworking Education: Tiny Table 4

Tiny Table 4 is another example for the final beginning workshop class project.  This charging table example is also 24 inches tall with a 9" diameter decagon (ten sided) top. It is also another example of detail continuity throughout the design.  These four Tiny Table projects are made as initial diverse examples to show and inspire the students. The creative projects designed and built by students of this class will become the new examples to show and inspire and challenge the next class of students. Rather than have the next class start from scratch with this project each class year sees a new baseline to challenge them to improve upon.  

Top face of decagon top.
The top started out 1.157" thick.  The top side has a 45 degree chamfer around the edge to help the edge look thinner.  The chamfer also catches light differently than the top, adding visual complexity/interest to the simple top. 

Decagon Top. Bottom view.
The bottom face of the top is carved to emphasize the ten sides as well as reduce the visual thickness of the wood slab. 

This project teaches how to chamfer the perimeter edge of the table top.  It also teaches a simple way to make an interesting 3D shape on the bottom face of the table top using the CNC software.   With the CNC software installed in the college computer lab, students are assigned to design their own 9" maximum table top, then save the toolpaths for it to cut on the small CNCs.    

There are 5 legs. Five legs provide the most efficient and stable footprint for the nearly circular top. All legs start at 3/4" thick.  The legs taper inward to just a bit thicker than .5" at the top inside corner. 

Beveled Edge and Tapered Thickness

The outer edge of the legs has a double chamfer that matches the corners of the top above them. The top edge of the legs is shaped to echo the carved underside of the top above them.

Top End Profile
The leg elevation view tapers down to 1.25" wide at the bottom. 

One of 5 legs.
The legs are a complex shape and require several processes to produce. This project teaches the logical sequence and tools used for the steps needed to produce it:
 
1. While the board is still a rectangle, cut double bevels on the straight outer edges of the legs. Use the table saw with blade tilted 18 degrees.
2. Cut out duplicate parts (5 legs) using a template. Use double sided tape or a few spots of hot melt glue to attach the template to the leg board.  Rough cut within 1/16" or so with the bandsaw and use a flush cut pattern bit on the router table to trim flush to the template.
3. Layout and cut mortises.  Use the mortising machine or the drill press with a Forstner bit followed by chisels to clean out the mortise. Or potentially start with a slot cut using an end mill in the router table followed by some chisel work to square the mortise.  A CNC configured for clamping boards on edge could also be used.
4. Taper both sides of the leg thickness from outside to inside edges.  Use a sled with shims to tilt the leg slightly (2.7 degrees) and run through a planer or the horizontal drum sander. Repeat on the other side but shim the board 5.4 degrees. Shims can be cut using the bandsaw. The digital angle gauge can check the shimmed angle. Hot glue in place before running through either machine. 
 
Short 1/2" thick stretchers are mortised into the inside edge of the legs.  The inner end of the stretchers dovetail into one face of the 5 sided center hub sections. Top and bottom edges of the stretchers have a small double 18 degree bevel to perpetuate the table top corner angle detail.
Top Stretcher Dovetail End

Top Stretcher Tenon End
There are two center 5 sided hub sections.  One is 2" tall underneath and connected to the top. The second is 3" tall and roughly halfway down the legs. The hubs connect all the legs together. Stretchers from the legs dovetail into these hubs.  Exposed ends of the hub sections are shaped to a shallow peak to contribute to the overall design aesthetic. This project teaches how to make a 5 sided block, and how to cut dovetail slots perfectly centered on the sides of a 5 sided block.
Top center hub.
There are 3 other Tiny Table examples that along with this one will show students the level of detail and range of creativity they are expected to achieve. The continuity of details in this project add to the story that can be told about it. It is the story about the table details more than a quick glance at it that make it memorable and more desirable.   

More related educational projects are here:

Sunday, April 10, 2022

Accessory Table. 5ft.

Tables with a round top ask for a nice base that looks great from all angles, and contributes to rather than distracts from the overall aesthetic.

This little 5 footed table stands sturdily and proud. Made from Cherry wood, and finished with Danish Oil.  The top has a French Ogee profile to add a little style. 

Legs are made from 3 parts joined together with mortises and tenons. The legs all dovetail into a 5 sided center hub at the top and lower down. Leg parts were rough cut then trimmed to identical shapes with a template and pattern bit on the router table.   

A nice stance.

No bad views.
The design evolved through iterative sketches. No design of mine falls directly onto paper. An initial sketch might be nice, but iteration never fails to improve upon the aesthetic appeal. How the design is made also evolves through iteration. 

Comments welcomed and appreciated!

4D

Just a Prototype

Often I sit with a sketchbook iterating little drawings of table designs.  A table after all is just a horizontal plane held above the floor with a structure. The structure's only purpose is to support the top and whatever it might be used for securely and reliably. Something to span the gap between floor and top and resist gravity. This can range anywhere from a solid block to a spindly center post with spindly feet. 

Iterate.

Occasionally I come to a design that appeals to me more than usual. If it looks even better a day later  I'll do a digital drawing of it. If the digital design is still appealing I often make a prototype. 

This little table is one outcome from such a process. The prototype leg shape is CNC cut from 3/4" thick MDF.  

MDF

The top is solid walnut.  The leg design I envisioned to be made from walnut pieces joined together.  No need in a prototype to use expensive material and labor though.   

Walnut Wood

I painted the MDF legs with red primer with the intent to then paint them with a final color.  The primer color looks good with the walnut top.  This is just an aesthetic prototype and once walnut legs are made the MDF versions will be discarded. Good enough it is. 

Underside

Overside
The legs dovetail into a triangular center post. Screws through the top hold tight to the post and legs.  Screws are counterbored  and covered with walnut plugs.

Comments welcomed.

4D

Elliptable. A Table Composed of Ellipses.

Ellipses are simple to draw using most CAD software.  They are also fairly simple to cut out using a CNC.  I designed and made this table before I had a CNC I could use though. It evolved from an idea I had to invert a simple ellipse drawing jig.  To test the jig out I used it to swing the wood panels through a router bit on my router table in elliptical paths. Every ellipse in the design was cut with the same jig.   The legs have a slight rounded edge that echos the ellipse shape of the top above. 

Cherry hardwood


The top came from the center.


Ellipse Jig

The legs join together with dovetails. This design is a good example of detail continuity.

An Ellipse Drawing Jig

Comments welcomed and appreciated.

4D